1) Subscribing to VERSO and Managing “My Account”
A new BASIC client will subscribe to VERSO through the VERSO promotional site located here
https://verso-logistics.com . VERSO provides a 30 dial trial period by going through the subscription process with all major credit cards accepted.
When subscribing there are 3 major areas you need to complete:
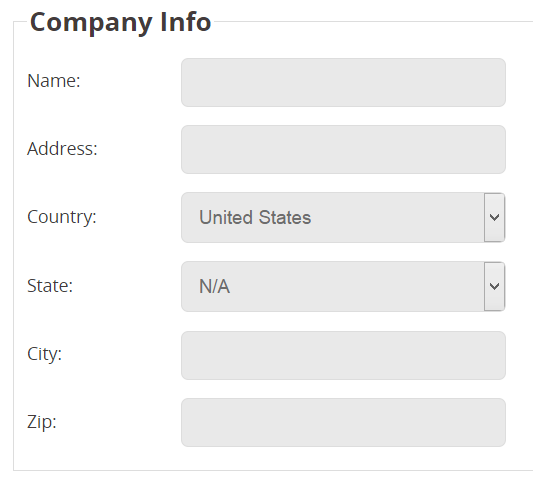
- Company information
- User information
- Payment information
VERSO does NOT retain any payment information, since all this data is securely passed and saved on our merchant services company’s platform. (BrainTree)
First, you will enter your company info and set up all the necessary data for your company. VERSO organizes information in the database by your company code, so only you, your customers and your designated users will see any data associated with your processes.
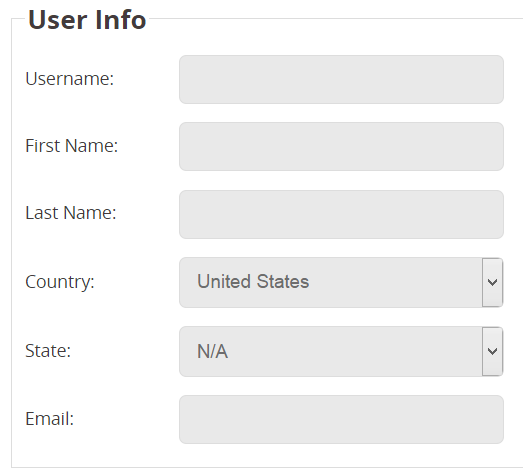
Second your User information:
Last, your payment information.
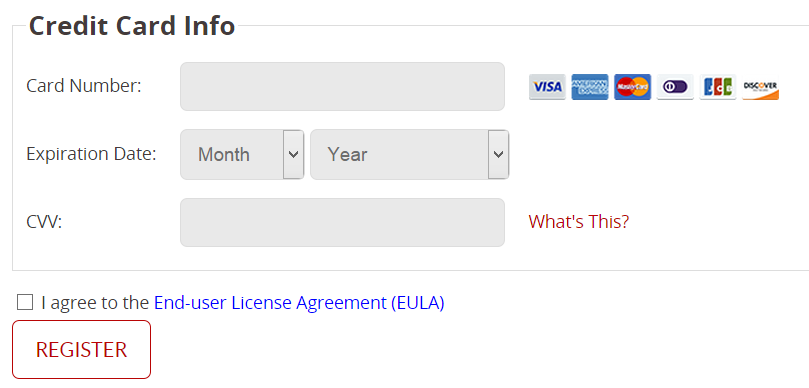
After you review and agree to the VERSO Basic terms and conditions, select the “I agree to the End-user License Agreement” then click on Register and you will receive an automatic email from the versoserver@gmail.com account; that will allow you to confirm your registration in the VERSO system
Here is a sample of the auto-generated email:
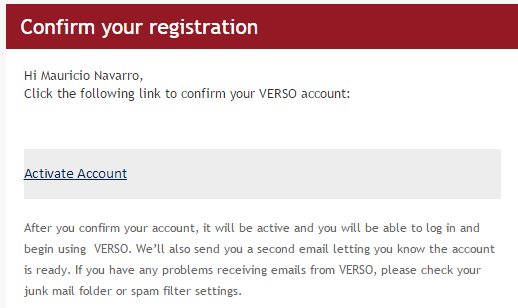
Click on the “Activate Account” link and set your password.
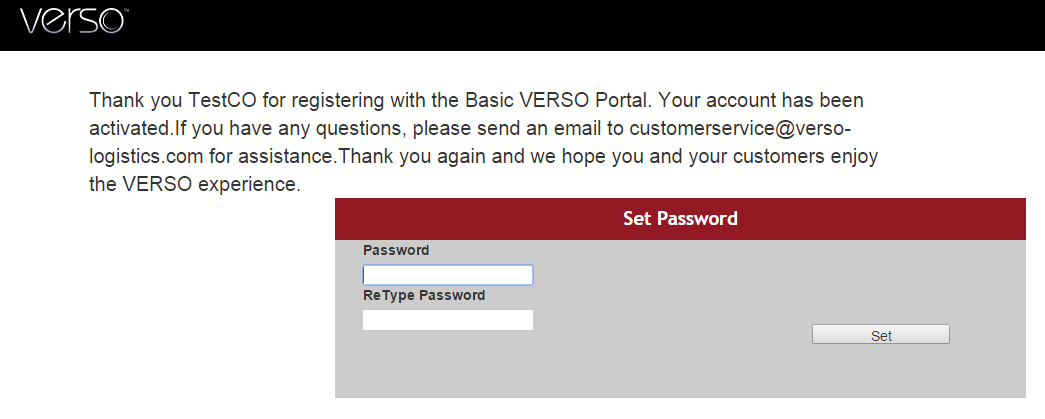
You will be directed to the VERSO login page where you will enter your username and password before entering the portal.
2) Adding and Managing Users – User Manager
VERSO users with administrator rights are responsible for adding and managing the users that will participate in your process within the portal. Users can receive different permission rights based on the settings within the permission user module (which is customizable to each VERSO client). For example, the system can be configured to allow ALL users the ability to create NEW MTRs, but only specific users or user groups (such as Technicians) and the administrator can be allowed the ability to change the MTR status and update fields after the MTR is created.
Steps to create a new user:
- Login to VERSO using your user ID and password you provided
- Click on the Control Panel icon on the menu bar

- Click on Users

- Click on Add User

- Fill out all the necessary information for the new userNotes:
- The user password you enter is a temporary password, the user will enter their own secure password once they complete the registration process.
- The company ID will default to YOUR company name.
- Select “default” under Organization at this time.
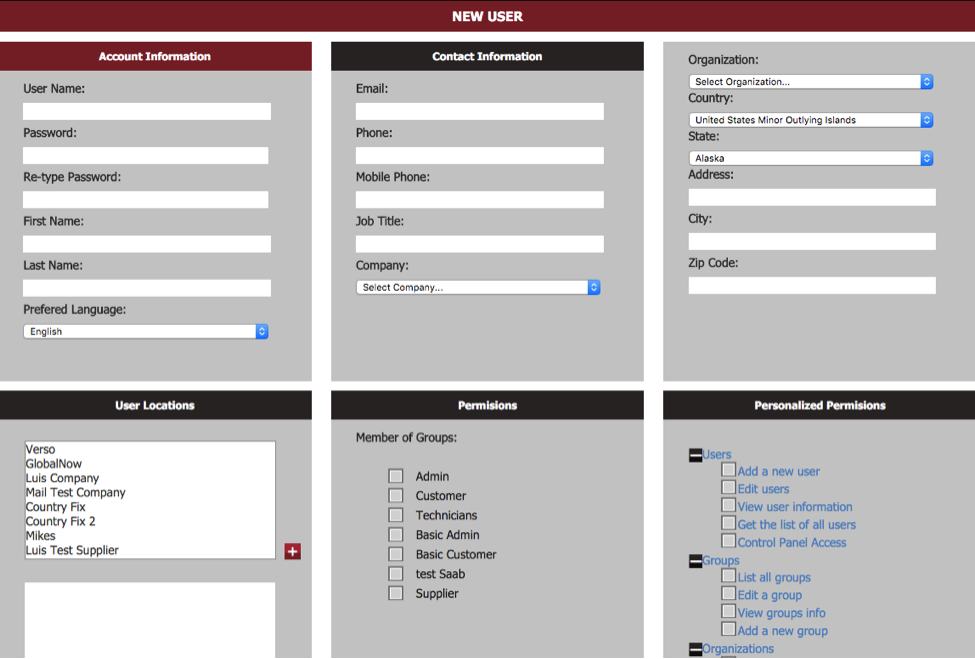
- Click on Submit

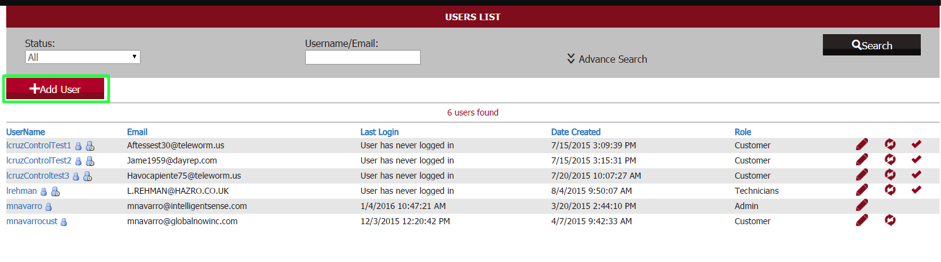
- You will receive a confirmation message that the user is being added. Each new user will be added to the end of the USERS LIST associated with your company.
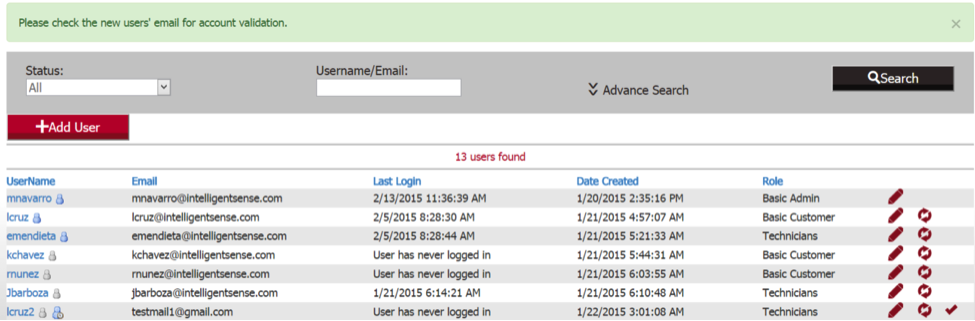
- Confirm/Approve the user by clicking (deselecting) the check mark to the right of the user information.

- Your new user record is now created and this user will receive an email (to the address you entered) asking them to confirm registration and set up their own password.
- If you need to deactivate a user, select the Change Status icon to the right of the individual User Name.
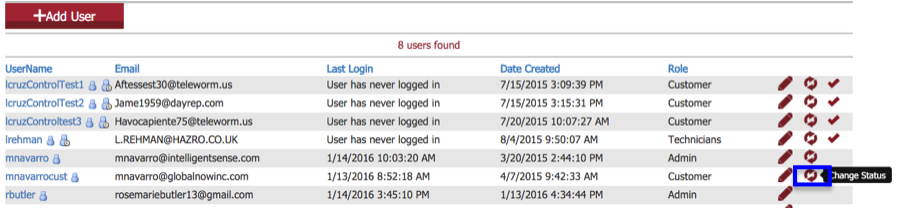
- Select “Yes” when prompted to confirm status change.

3) Uploading and Managing Warranty Information
VERSO provides an automatic warranty verification feature. This function compares the product and serial number combination entered by a customer when submitting a new MTR with order records uploaded by you to your VERSO database. This upload is accomplished by either manually uploading an excel spreadsheet containing the relevant information or automatically through VERSO’s API service.
Important Notes and Tips:
- You as the subscriber of VERSO are NOT required to use the automatic warranty feature. Automatic warranty is NOT required for a user to create an MTR. The user can create an MTR with no match to an upload record, but the warranty field will reflect N/A, and they will be reminded to enter a product description and product number.
- The upload process is NOT a complete replacement. The following rules apply:
- A new upload file does NOT replace the existing records on the database
- Duplicates WILL be prevented from uploading
- Records must pass the field edits described in the download file (see below), if they don’t pass they will error
- If the subscriber needs to delete a record, they must do it manually through the system.
For the manual upload option, VERSO allows you to use two types of files (XLS and XML), Here is an example of how to create the file:
- Log in to VERSO
- Click on Control Panel

- Click on Import Articles
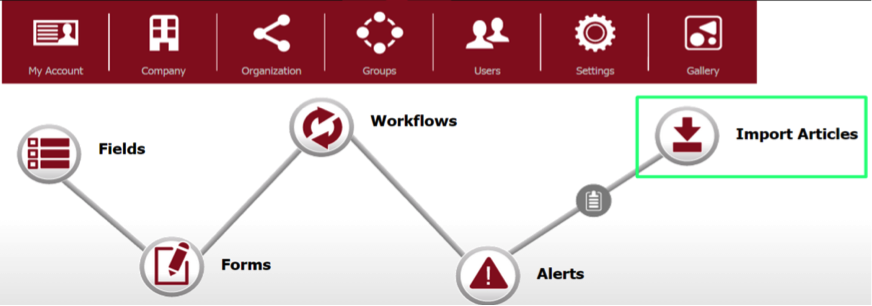
- Click on Import Article

- Here you will see at the top right corner of the screen the template for the excel warranty input file. Click on the Excel option ( XLS ).
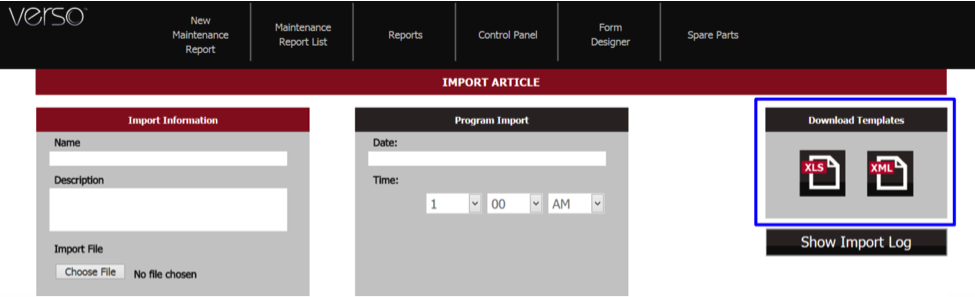
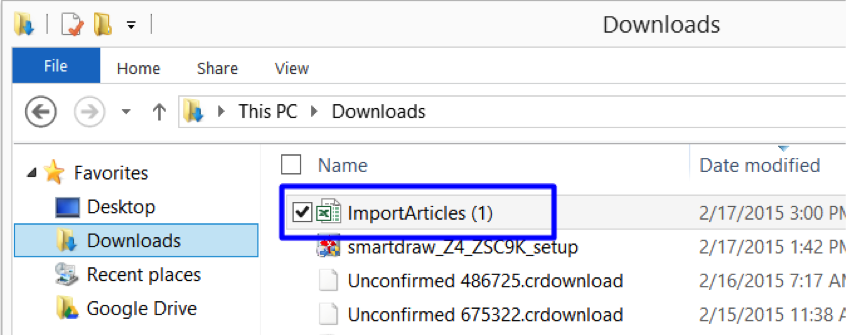
- Go to your download area and search for the file called “ImportArticles” and open it.
- Fill out the document using the file template provided and save the file to your local machine.
 Once your warranty file has been created, you can upload it the system database.
 - Log in to VERSO
- Click on Control Panel

- Click on Import Articles

- Click on Import Article

- Fill out all the necessary information, select the file you have created already and click on “Upload Now”
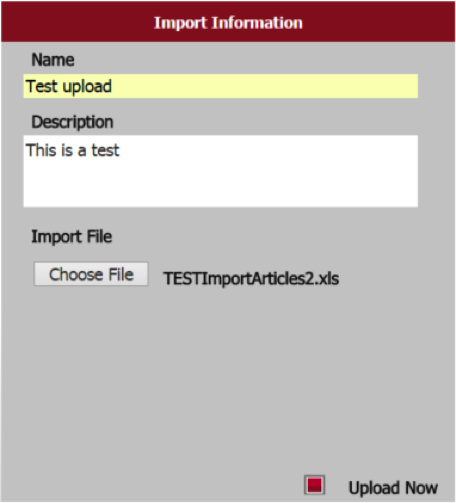
- Click on Submit

If the import is successful, you will see a message stating such. If there are errors you will see a screen with an error message specifying the file row which contained the error, and the corresponding error type. For example this file had an invalid Contract No.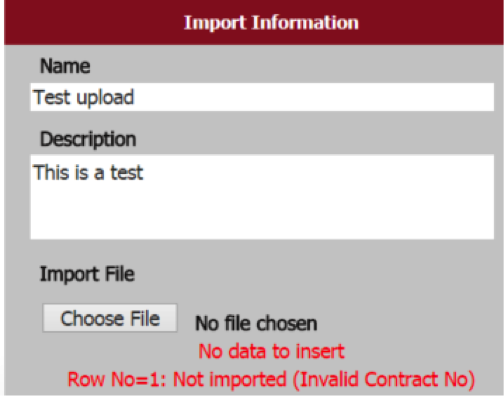
Note: There is also the option to automatically load warranty and order information from your ERP or other third party systems using the VERSO API. API implementation instructions are found in this file:
4) Creating a New MTR
Any user with the appropriate permissions can create a new Maintenance Trouble Report (MTR). Once the MTR is submitted, it will follow the appropriate workflow designed for the form – either Contract, Company or the set default (see the section on Form Creation which explains the three levels allowed for MTR form use). When creating a new MTR, a customer is providing the necessary information to begin the trouble reporting and RMA request processes. As mentioned above, 012MTRs will be validated (checked) against the database to determine warranty status, based on your warranty records uploaded. If no match is found, or if you chose not to use the warranty process, the MTR can still be submitted, but will be flagged as “not validated”.
Below are the steps to create a New MTR:
New MTR Verified:
- Log in to VERSO
- Click on New Maintenance Report

- Select your company from the Dropdown List.
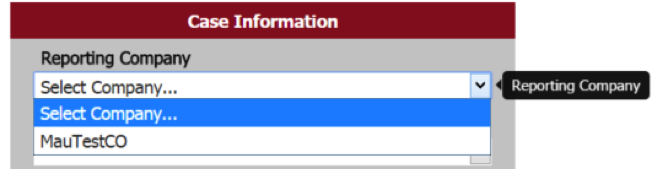
Your information will be automatically populated. This will be the only company option for you and your customers.
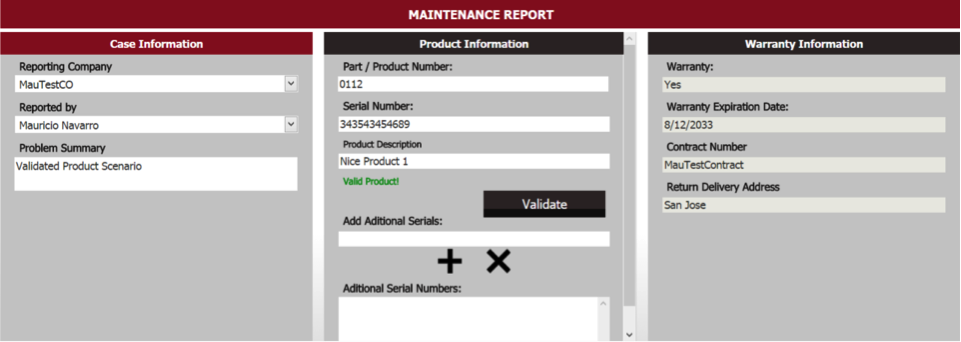
- Enter the information for Part / Product Number and Serial Number then Click on Validate. If the record finds a match in the database, you should see a message stating that Product was successfully validated. The Warranty information will automatically be retrieved from the database and inserted into the appropriate fields.
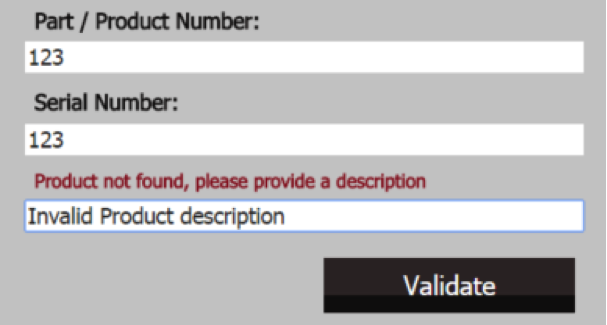
 If there is no warranty match after clicking on validate, then the user will be required to insert a product description, and asked if they would like to continue to submit the MTR. The Serial Number field can be blank at this point.
- Click on OK and provide a description, then click on Validate again.
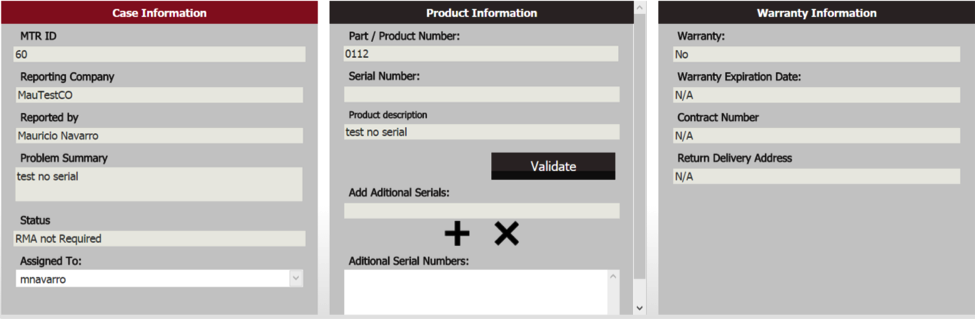
You will notice that the Warranty Information is displayed with empty values; however the rest of the MTR is the same as a Validated MTR.
No warranty information will be populated since there was no match.
- Click on OK and provide a description, then click on Validate again.
- Complete the additional required fields in the “Additional Information” section and attach any relevant files that support the MTR (such as product image). Click on Save File if files are attached.
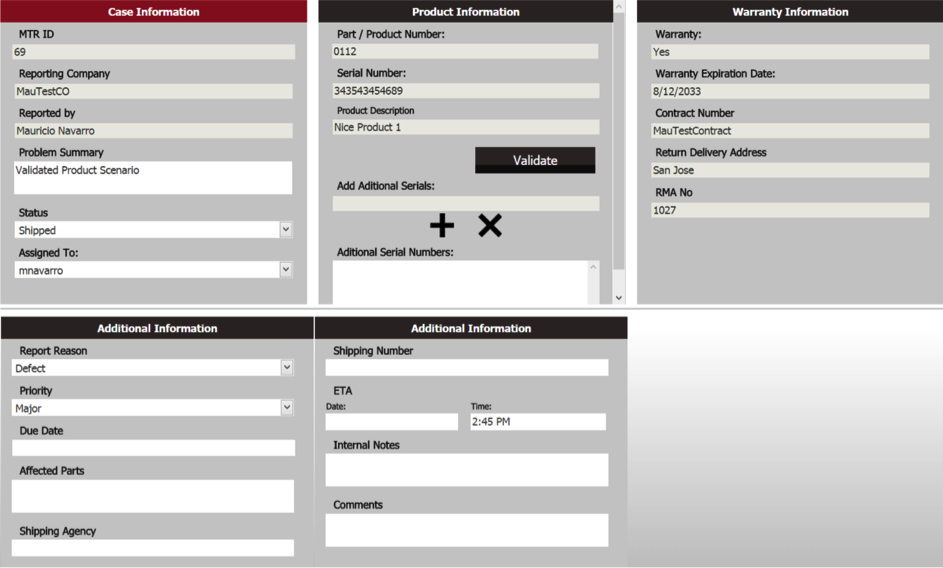
- Click on Submit, you will be asked to confirm if you are ready to create the MTR, click on Yes.

- You will be taken to the main page of the MTR list with a message stating MTR created successfully – the NEW MTR will be at the bottom of the Maintenance Report List.
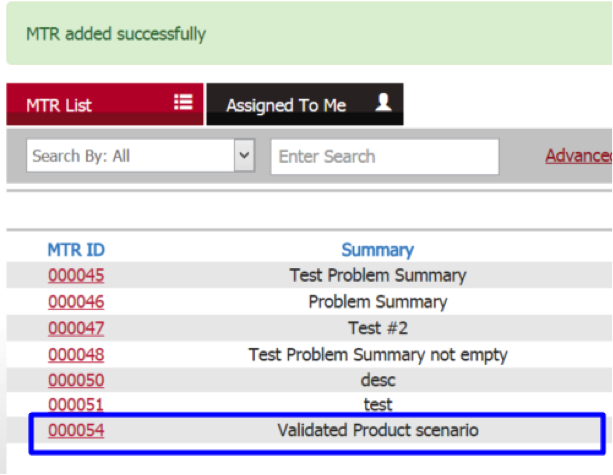
You can confirm from this list whether or not an MTR is validated by looking at the checkmark to the right of the Summary field. The red check appears when an MTR is validated.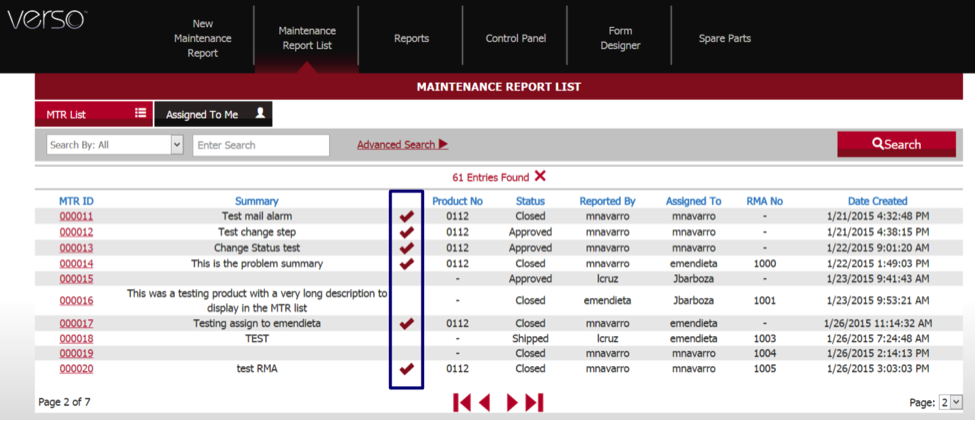
Important notes and tips:
For MTRs in the NEW status, VERSO will generate a daily email to the administrators ID with a message that the MTR is still in the NEW status, UNTIL the MTR status is changed. This alert to administrators brings awareness of outstanding MTRS submitted by customers that have yet to be addressed (opened). Below is a sample e-mail notification: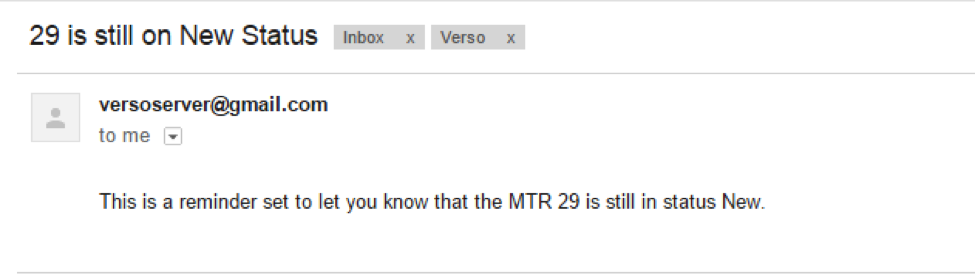
5) Updating and Completing MTRS
Once an MTR is submitted by a customer, you and the users with the correct permissions will have two primary actions when managing the MTR process:
- Changing an MTR status
- Updating fields on the MTR form
Every MTR created will follow the workflow designed for the particular form (depending on the status of the MTR, it can only be changed to pre-defined statuses); and displays standard fields for your use at various states of the workflow.
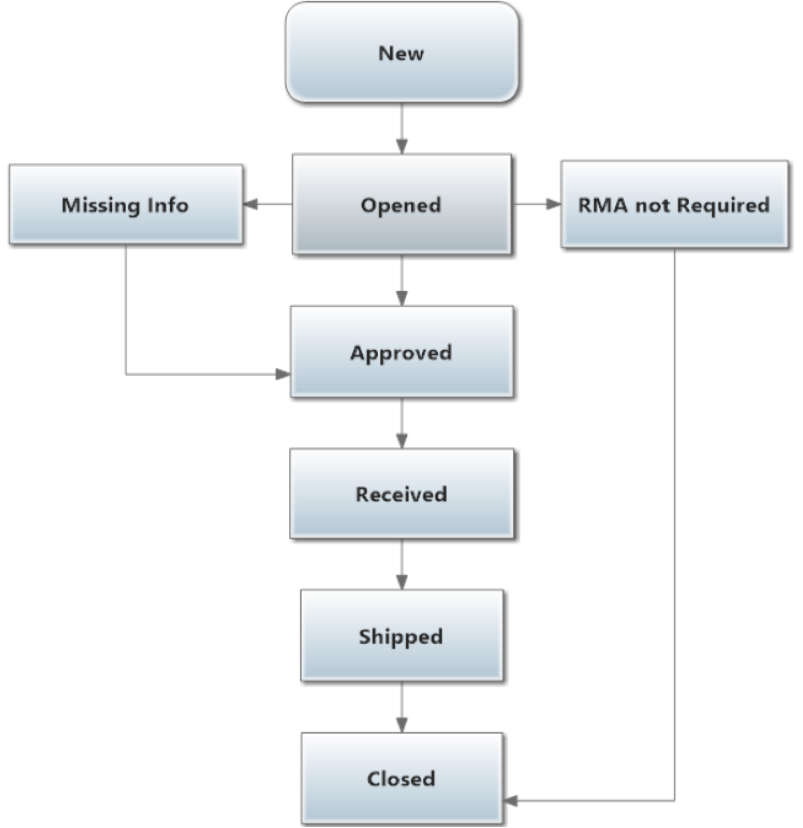
Below is an example of a simple workflow used for the Basic Edition:
VERSO will guide the users to provide the next “status” change by only allowing the status values assigned by the form/workflow creation process. In addition to the status changes, the internal users (company individuals with the correct permissions), will update the additional fields that appear when you select a status change.
- Log in to VERSO
- Open the MTR you are trying to update
- Click on the Edit MTR button

- The Status field will become editable and you will be able to choose the next status according to your current status.
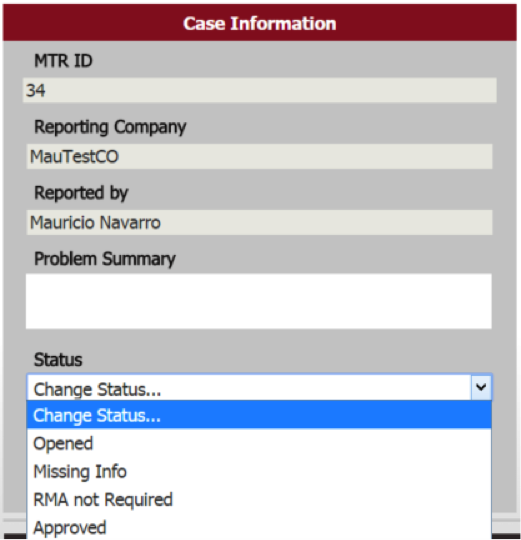
- When you select the status you are trying to reach, the new fields in the area called “Additional Information” will become available according to the status you selected. Fill in all the necessary information and click Update.
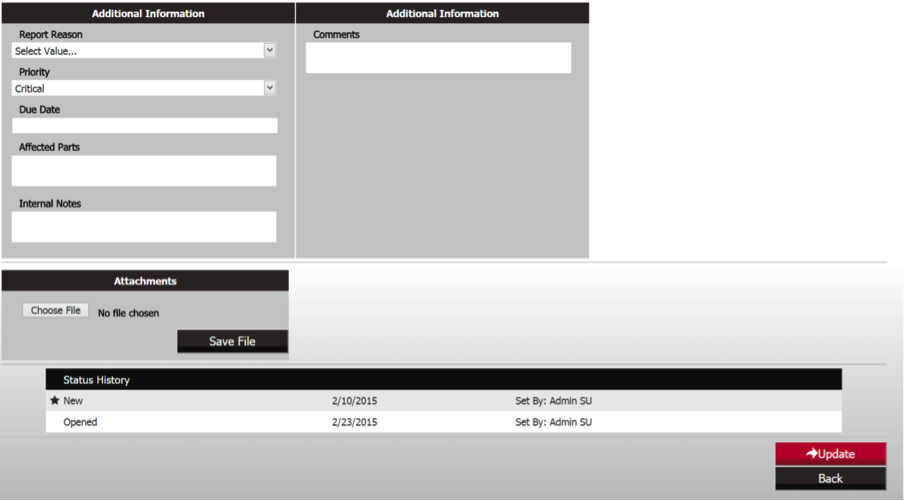
- Click Yes and the new status will be saved correctly.
Notes and Important information:
- Whenever status changes occur, VERSO generates an email to each relevant user associated with an MTR, including: the administrator, the assigned technician and the customer. See example below:

Assigning MTRs to a User
Every newly created MTR receives a status of New and is automatically assigned to the VERSO Admin (subscriber). After this, you will open and change the status to “Opened”, indicating that the MTR has been received and is now being addressed. At this point, the Admin can open the MTR and change the person the MTR is assign to. This allows every admin/company assigned person to know what MTR they are working on and helps keep a better track of their workload.
This is how an MTR can be reassigned:
- Log in to VERSO
- Open the MTR you are trying to update
- Click on the Edit MTR button
- Go to the status area and make sure to place the status in Opened. After that, the Assigned To field will automatically appear letting the user see a list of all Admins and users with permission in the system that the MTR can be assigned to.
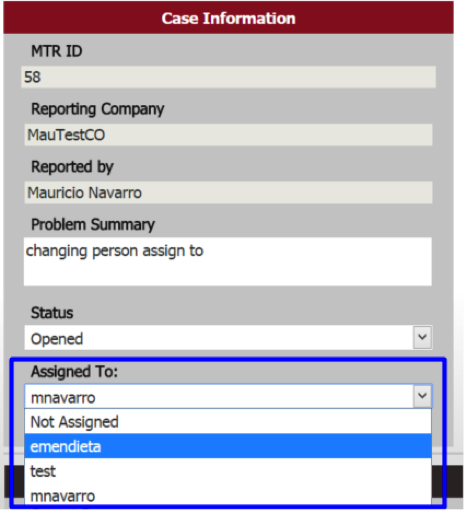
- Click on update and the MTR will be automatically saved with the new values.
6) Searching and Reporting on MTRs
For searching and reporting MTR information, login to VERSO (you are automatically directed to the MTR List menu area).
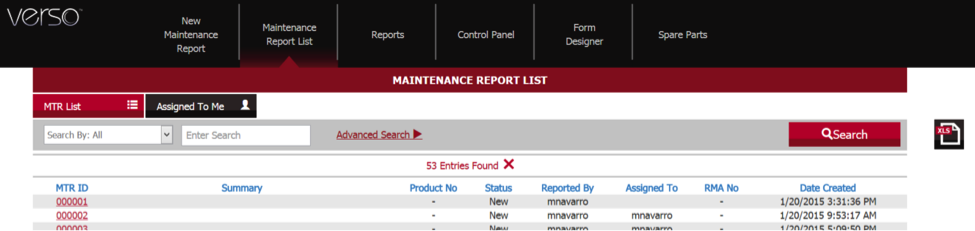
There are two different search options:
- A simple search allows you to search based on a field value (MTR ID, RMA number, etc.). Input the search value and you will receive the specified MTR record. If you select “Search by: All” the system will send back all the MTRs created in the company.

- Secondly, if a more thorough search is needed, click on the “Advanced Search” link and a new menu will automatically display for you allowing additional search options (MTR Status and Date Reported).

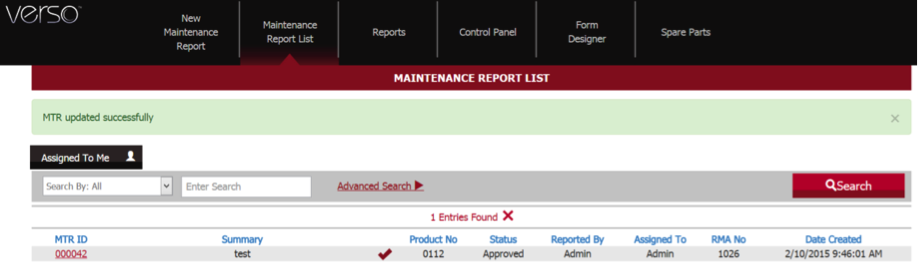
Another feature of VERSO is the ability to download the entire list of MTRs onto a user’s computer. The excel spreadsheet file download allows the user to sort through all the MTRs created in this format. Here is how to complete a download:
- Log into VERSO
- Click on the XLS button at the top right corner of the screen

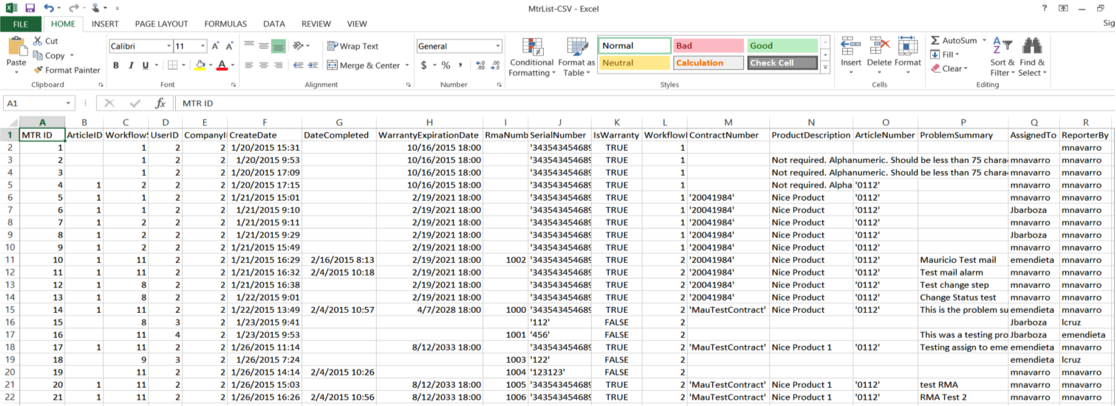
- The MTR list will be automatically downloaded to your local download area. Search for the file named “MTRList-CSV”
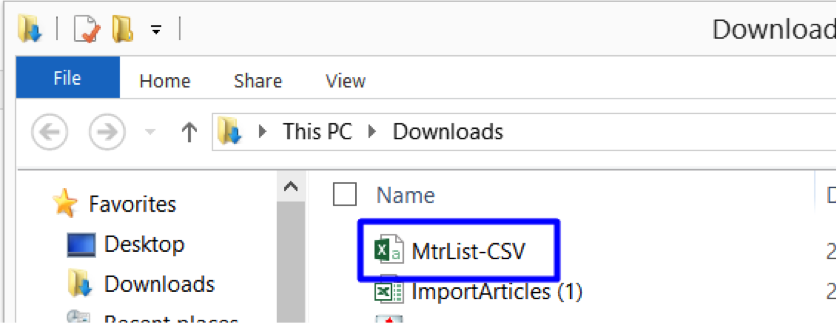
- Open the file and you will be able to see all the MTRs.
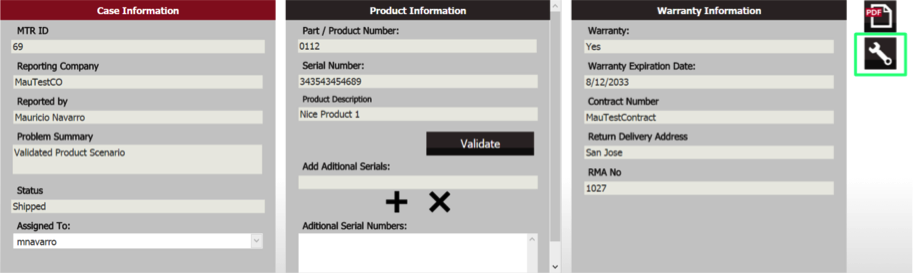
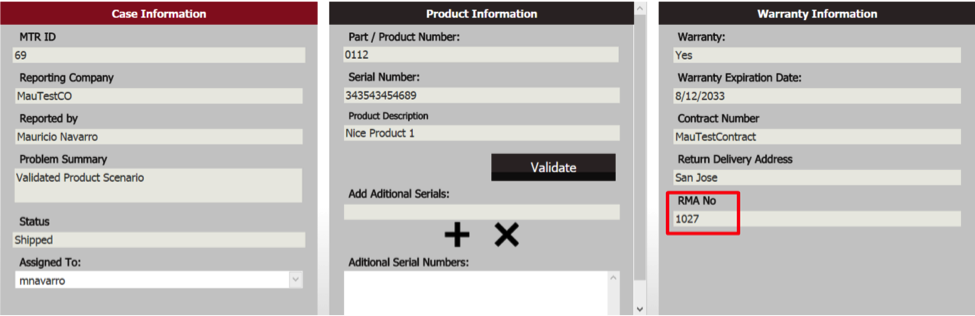
7) Printing an RMA/MTR
Once an MTR reaches the “Approved” status, the system automatically generates an RMA number. The RMA number is inserted in the MTR record and can be viewed on both the MTR List and on the MTR Form.
Maintenance Report List view:

MTR Form view:
Once the MTR form is opened, it can be found under the Warranty Information column.
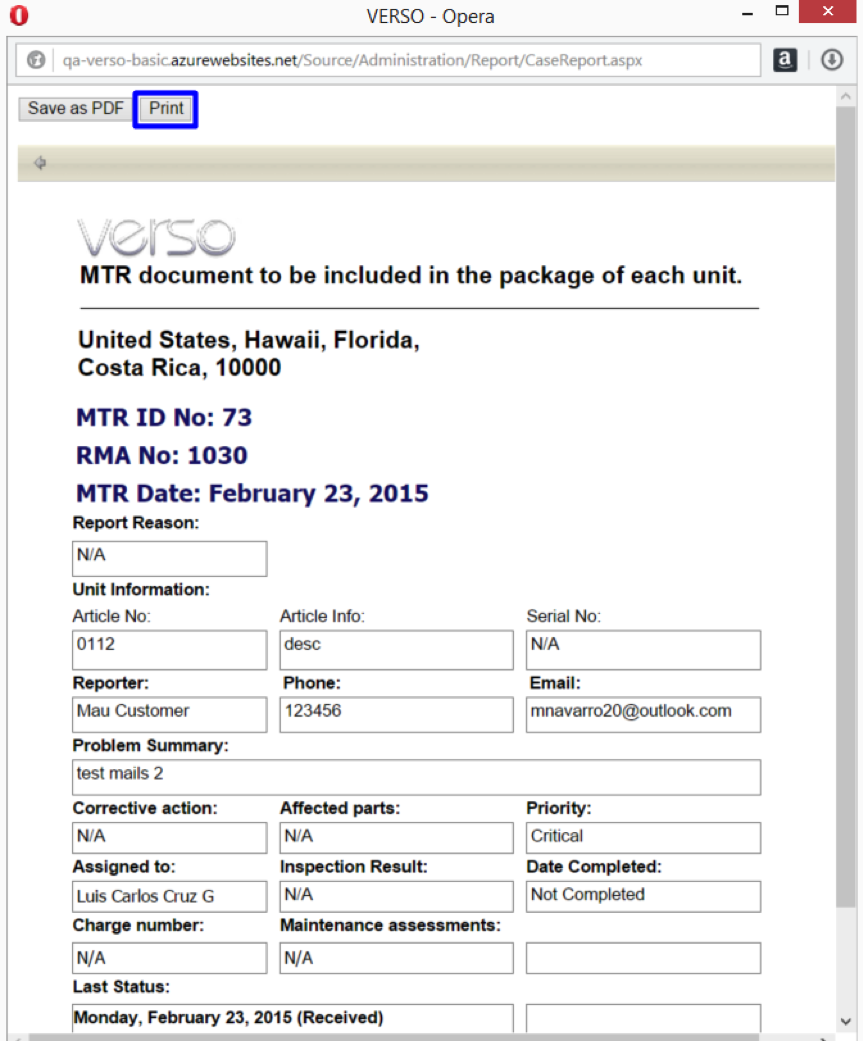
The user can print the MTR/RMA form for internal records, and for inclusion in the return package. To print the form:
- Log in to VERSO
- Click on the MTR
- Click on the PDF button on the top right corner
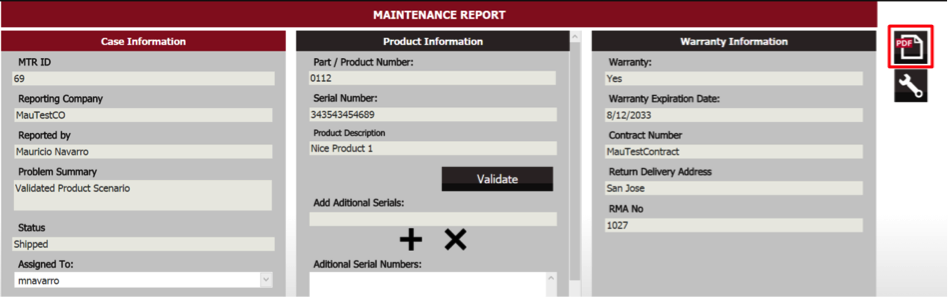
- The document will automatically open on a new window (make sure your browser has the pop op option enabled). Review the content.
- Click on Print.
The customer will insert this printed form as the RMA into the package to be returned to you. The address for return (your company address) appears directly above the MTR ID No.
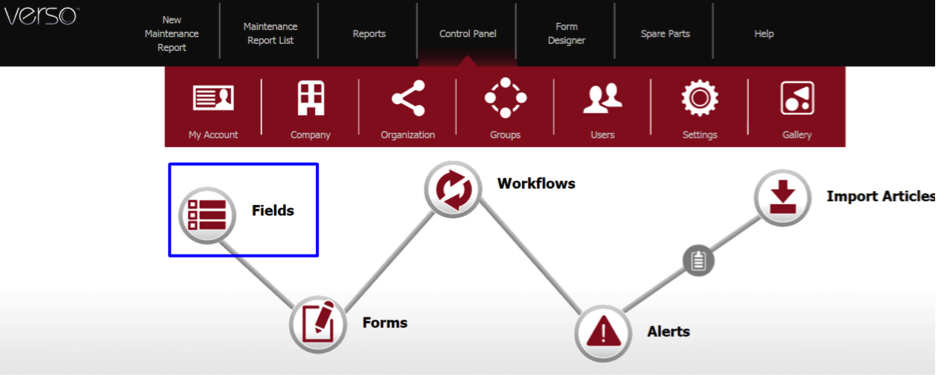
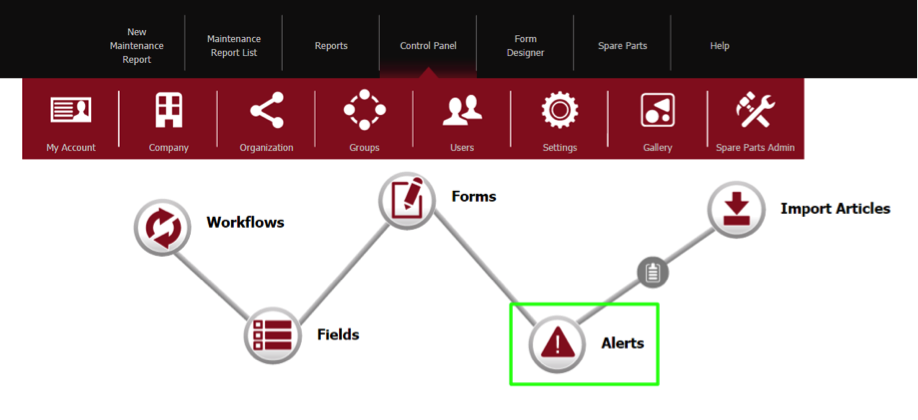
8) Forms Creation
VERSO provides a high level of flexibility that allows the creation of custom workflows and custom field presentation and utilization – which resides on a custom form. A Form is created using three modules:
- Fields Management
- Workflow Management
- Forms Management
The final outcome is the FORM that represents the specific requirements for handling trouble reporting and product returns.
Fields Creation
In this module you will create all the necessary fields that area going to be used in the Form.
- Log into VERSO
- Click on the Control Panel icon on the menu line

- Click on Fields module
- Click on Add Custom Field
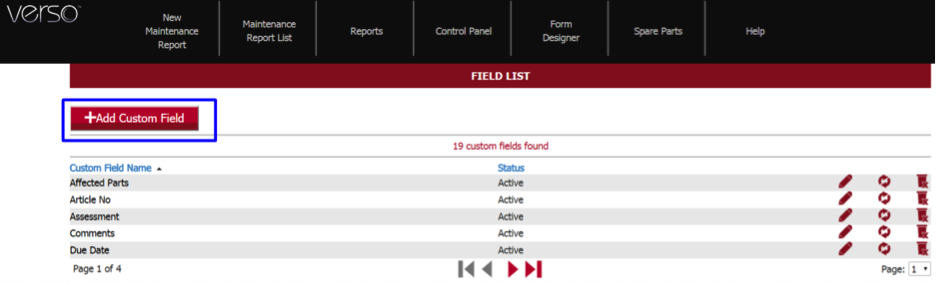
- Fill out all the necessary data and then click on the Submit button to save it.
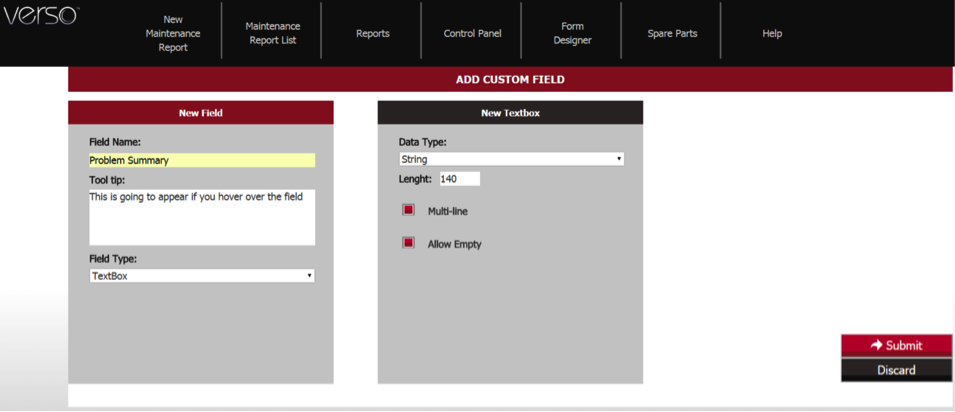
Important Notes:
- Use a relevant tool tip.
- Please note the many types of available types (Text Box – Dropdown List – Checkbox List – Radio Button List – Date – DateTime)
- Multi Line means that the area will allow multiple lines to be presented on the form
- Allow Empty means that, if checked this field will not require a value to be inserted by the users.
Once you create all the fields necessary, you can see a list: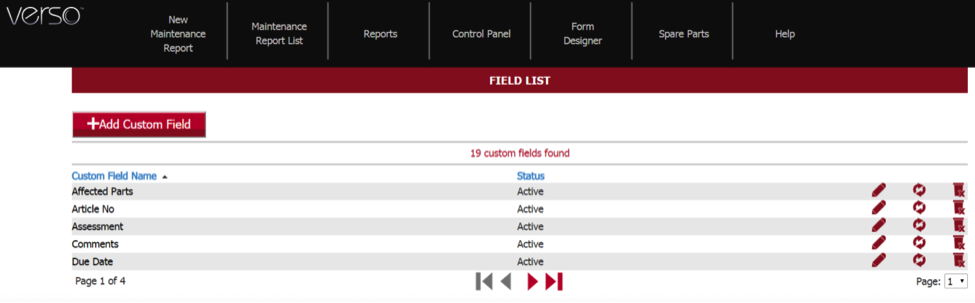
Workflows
Once all the fields are created, you will need to create the workflow that your Form will use. Within VERSO, Workflow represents a series of steps that can occur from the “NEW” status to the “CLOSED” status. It’s a good idea to initially draw on paper the steps and logic that will reside in the form. From there, you can easily implement into VERSO through the workflow module.
As an example, a default form is provided “out of the box” from VERSO below:
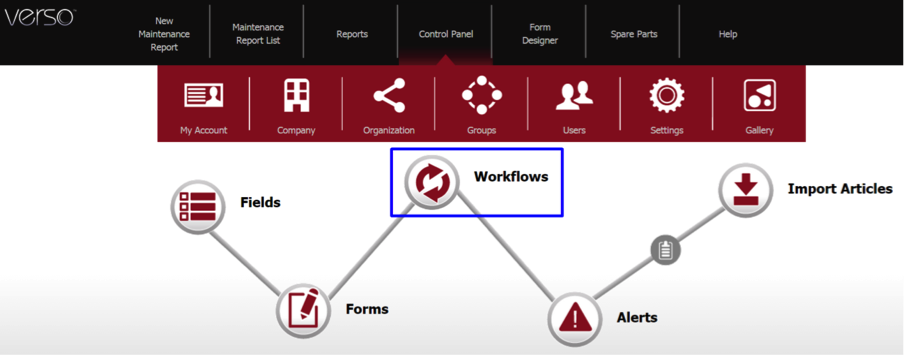
In order to create the workflow in VERSO follow these steps:
- Log into VERSO
- Click on the Control Panel icon on the menu line

- Click on the Workflows module
- Click on Add Workflow
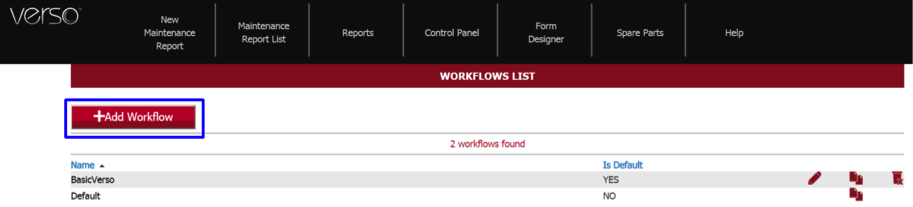
- Notice that the Steps “Initial Step” and “Final Step” are already present, those are normally called “New” and “Closed”, however you can rename them if you prefer.
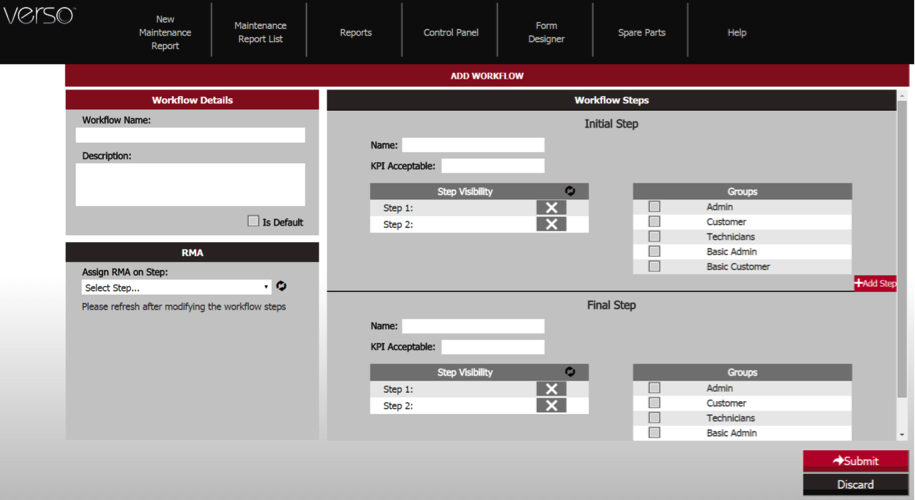
- To create additional steps, click on the “+Add Step” button.
- Once you are done creating the Steps, you will notice that all the steps are reflected under the “Step Visibility” section. Checking the box to the right of each step name under the step visibility list will cause that particular step to be visible on the MTR as a next status option (that can be selected by the user); when the MTR is in the status/step at the top of the screen.
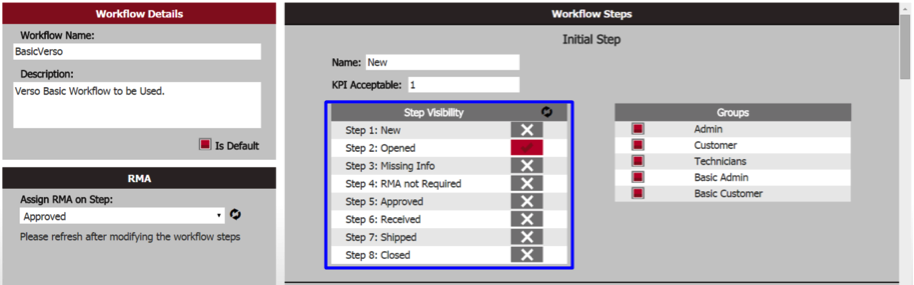 In this case this screen is showing that when the MTR is on status “New”, the only next step option that can be selected is the “Opened” step.
 - Key Performance Indicators (KPI) is a value (in days) set inside the workflow step that designates the number of days when a notification email should be sent to the users of this step (see the Alert Module).
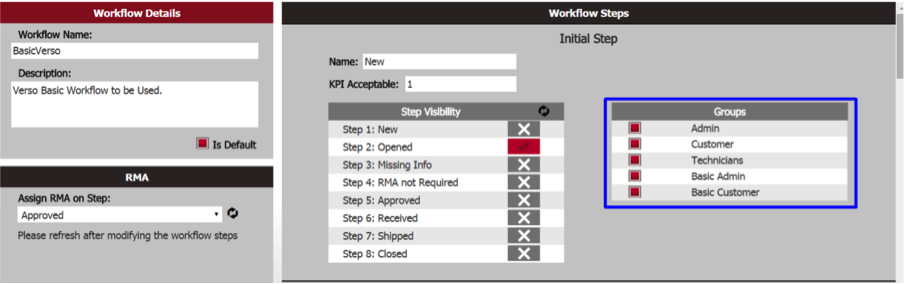
- The groups that show on the right of the Step will determine which user groups have visibility to this step. These can be selected or excluded as you preference.
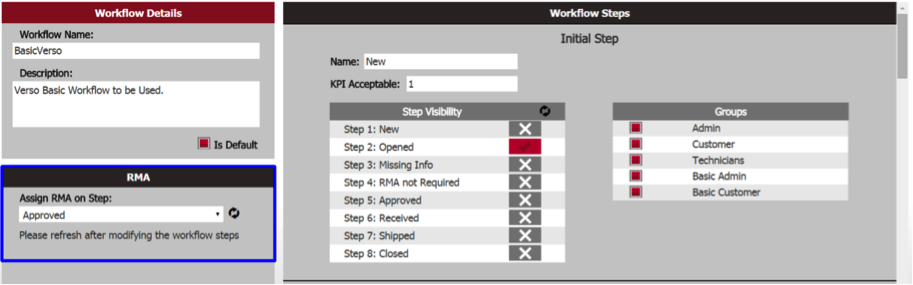
- The Field called “Assign RMA on Step” indicates which step in the workflow an RMA number will be assigned. In the below case the RMA number is created once the MTR reaches the “Approved” status.
- If you select the “Is Default” box, this will make the Workflow the default workflow to be used by the system.
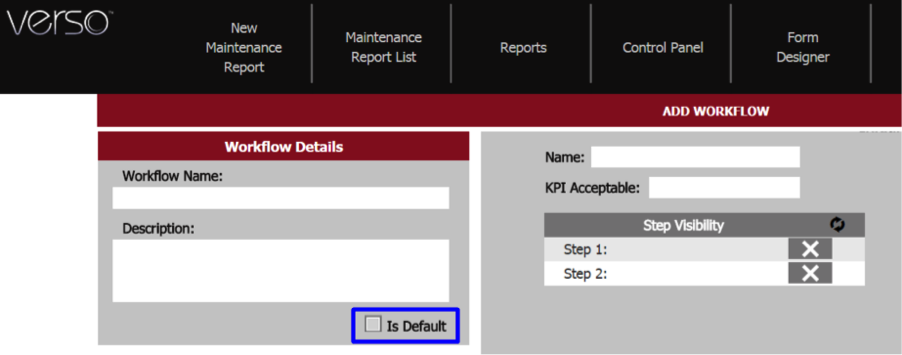
- Once you are finished creating the steps and assigning their visibility, your Workflow is created by clicking on the “Submit” button.
Creating the Form
Once you have created the necessary Fields and the Workflows (you can also use the VERSO defaults Workflow) you are ready to create the form. You can create as many Forms as you like, and the form can be ASSIGNED to one of three TYPES (levels):
- Company – example: A form (with unique workflow and fields and KPIs) can be created for a specific company value (such as a dealer, client, or location).
- Contract – example: A form (with unique workflow and fields and KPIs) can be created for a particular contract with a dealer or client.
- Default – example: A form that is used for all MTRs, or MTRS that do not have an associated company or contract form.
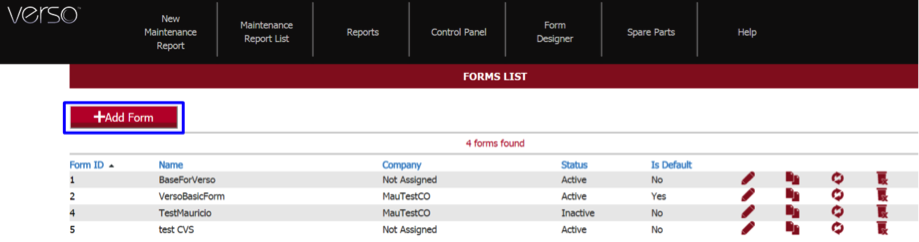
- Log into VERSO
- Click on the Control Panel icon on the menu line

- Click on Forms

- Click on “+Add Form”
- Complete all the information under on the left side panel, including the form type, depending on your requirements. A form can be created without an assigned Workflow, however it is recommended that you assign a Workflow so that the step logic is used. More fields can be added if needed. Note that every new MTR created will first determine if it should use a particular contract form based on a match with product/serial numbers in the VERSO database. If the product record in the DB does not have a contract value, then it will check to see if it has a Company value associated. If no company value exists, then the MTR will use the Default form.
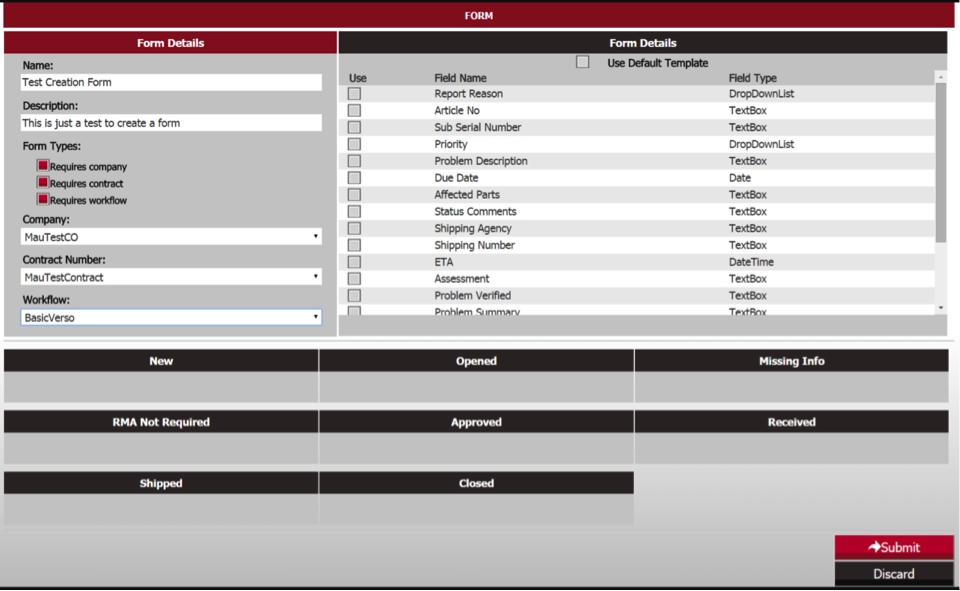
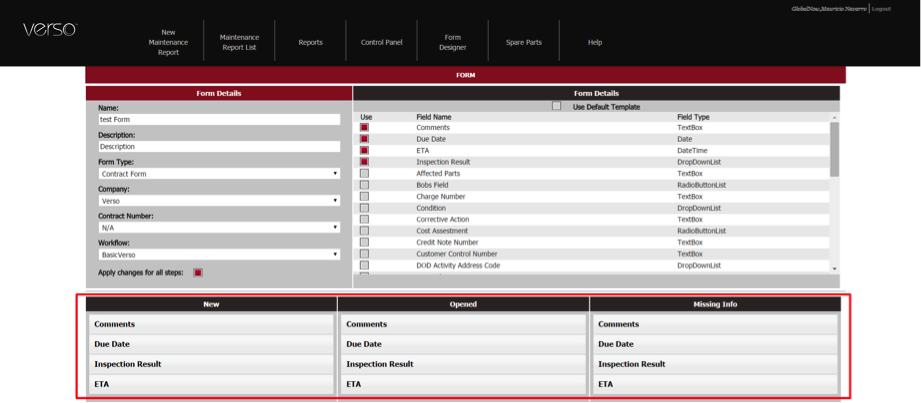
- Once you complete the data on the left side panel, the steps from the assigned workflow will automatically appear at the bottom and the fields previously created now appear in the right side panel. From the right side panel, Select all the Fields necessary for your Form.
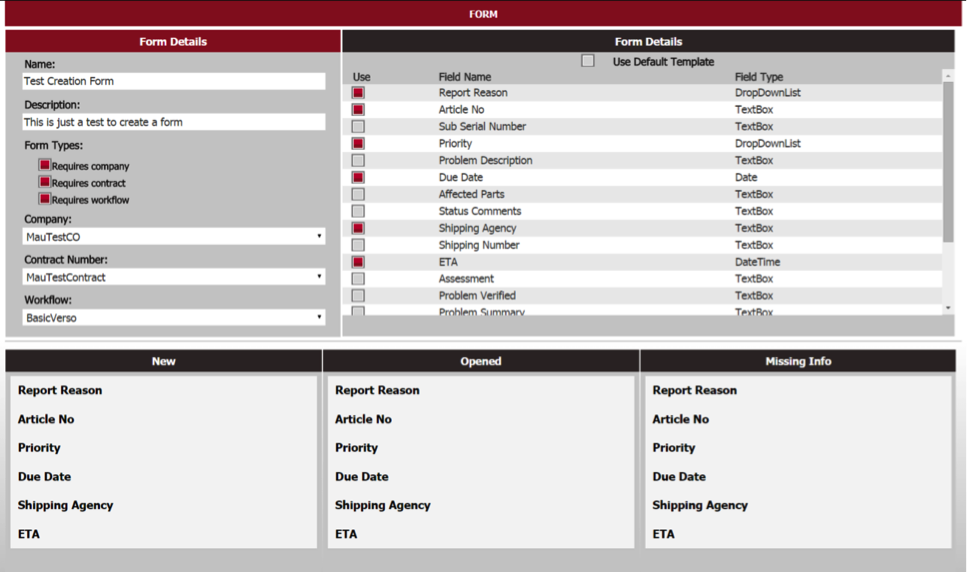
- Once you have selected the Fields, they automatically appear on all the steps of your Workflow; however you can designate which Fields will be visible on the particular steps. For instance, some of the fields should only appear with steps that make sense. Browse each field list for each step, designate those that should appear for the step, and designate the groups of people that are going to be able to view and/or edit the field.
Click each field to expand, allowing you to view and edit permissions.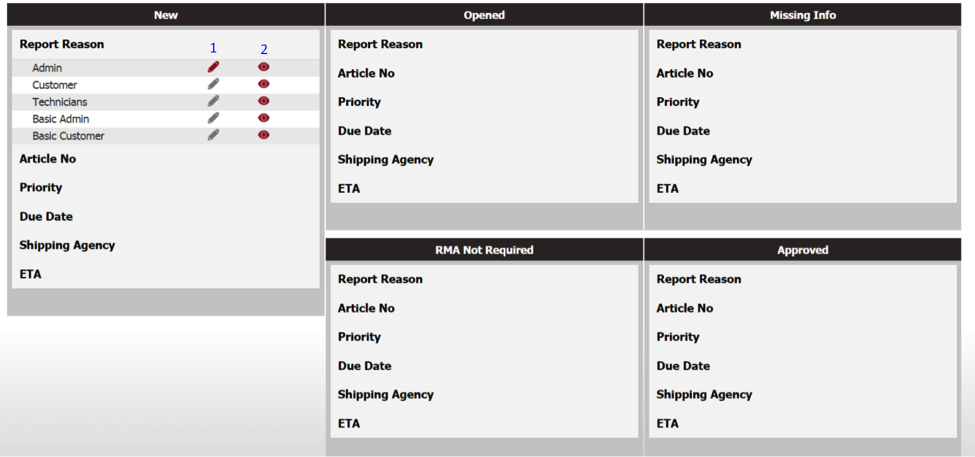
- Column 1 shows the groups that are able to edit the field and column 2 shows the groups of people that are able to see the Field being displayed. In this example, ”Report Reason” on the Step “New” is going to be Editable by the group “Admin”, the remaining groups will be able to see the Field but not Edit.
- Also, for every step you can change the order in which each field appears with a simple drag and drop to the desired position.
- Click on Save once you have finished loading all the steps.
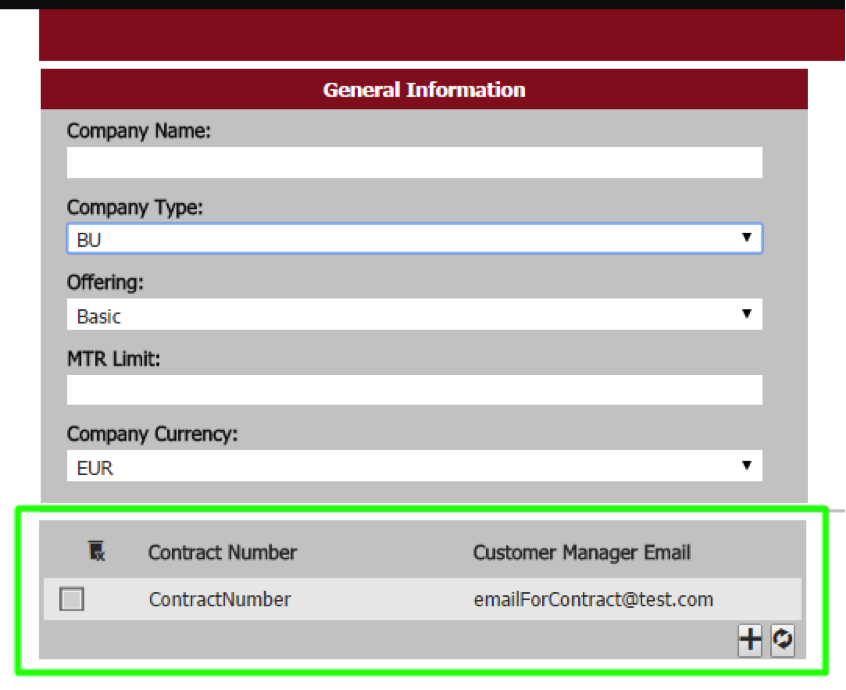
9) Company Creation
Every VERSO Installation allows the customer to create multiple companies for different purposes, such as clients or suppliers that will require use of VERSO services.
To create a company:
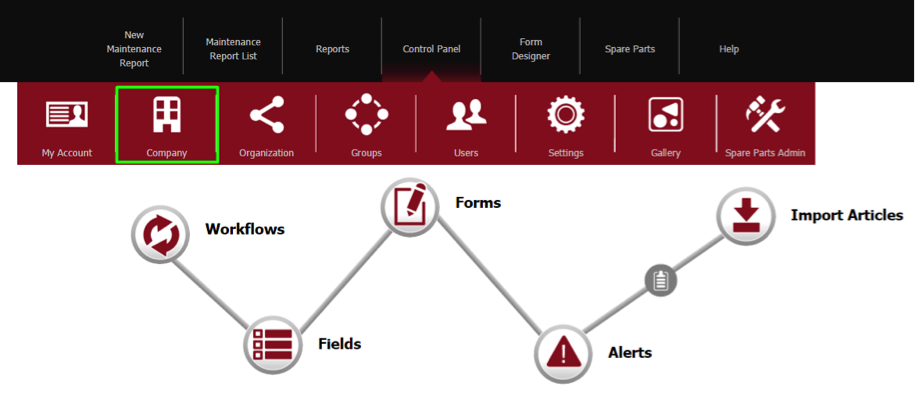
- Log into VERSO and Click on Control Panel:

- Click on Company
- Click on +Add Company

- Fill out all the data necessary for the company that you are creating.
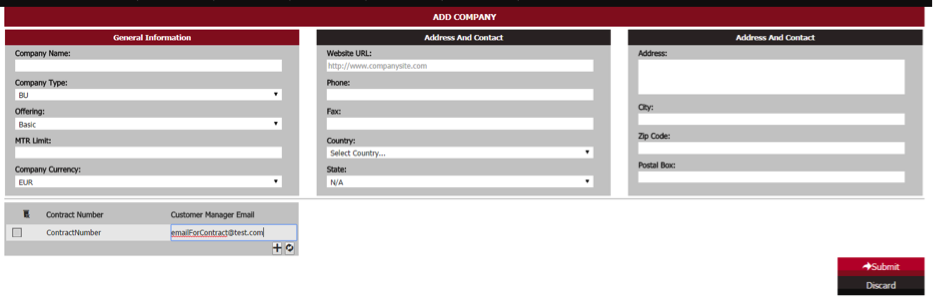
- Notice that in here you can select the type of company that you are creating (Supplier, BU, etc.)
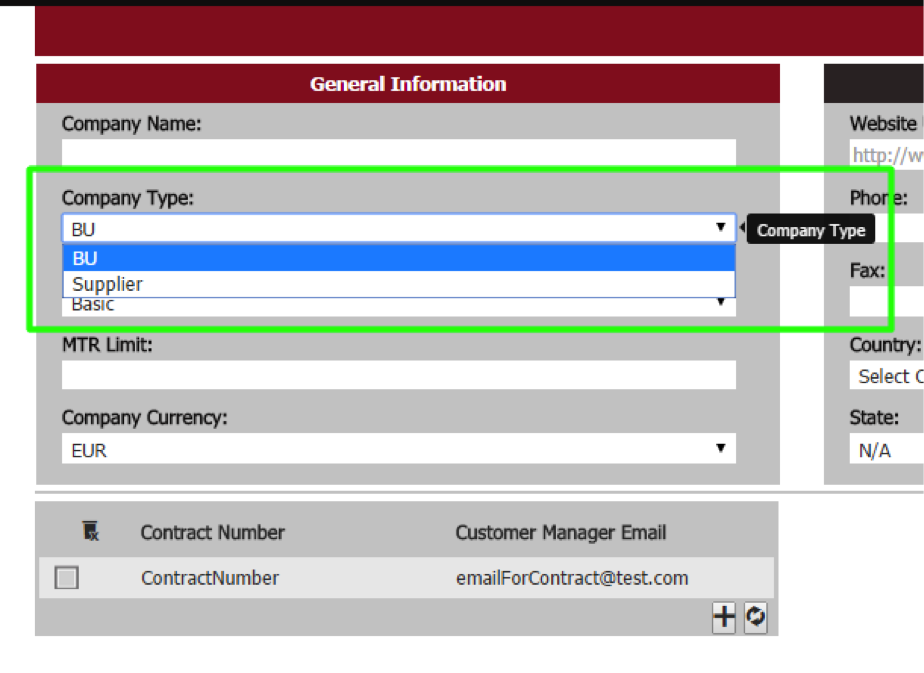
- You can create as many Contract Numbers needed by adding the Contract/email combination and clicking on the + button.
10) User Creation
VERSO allows you to create the required amount of users for your company. Permissions for each user can be managed and customized to fit your business needs.
First we will create group permissions (Administrator-customer-technician,etc.) that can be assigned to individual users.
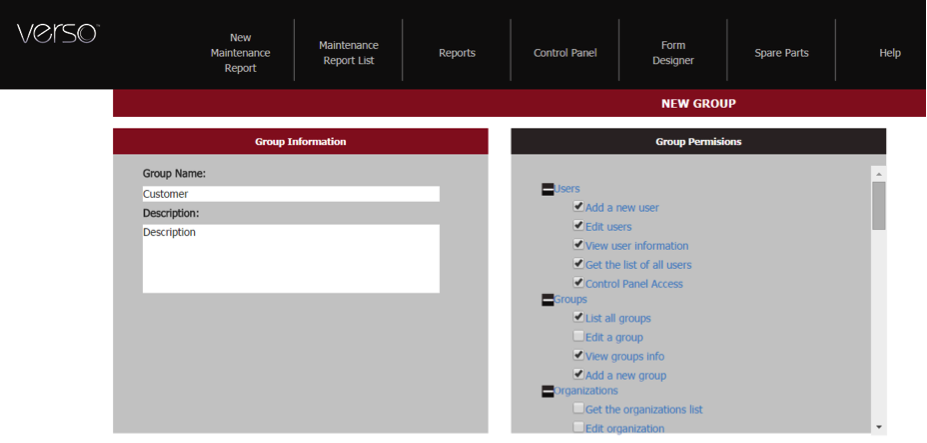
Set up your Group Permission
- Log into VERSO and Click on Control Panel:

- Click on Groups
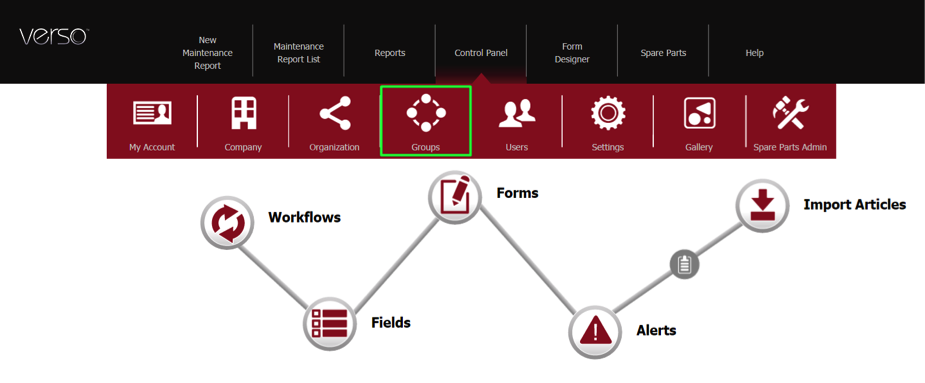
- Click on +Add Group
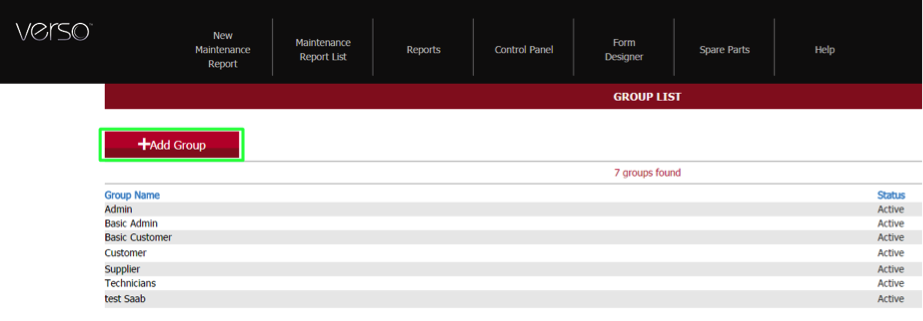
- Fill out all the necessary data by selecting the actions that this group of users will be capable of performing.
Create the Users
- Log into VERSO and Click on Control Panel:

- Click on Users
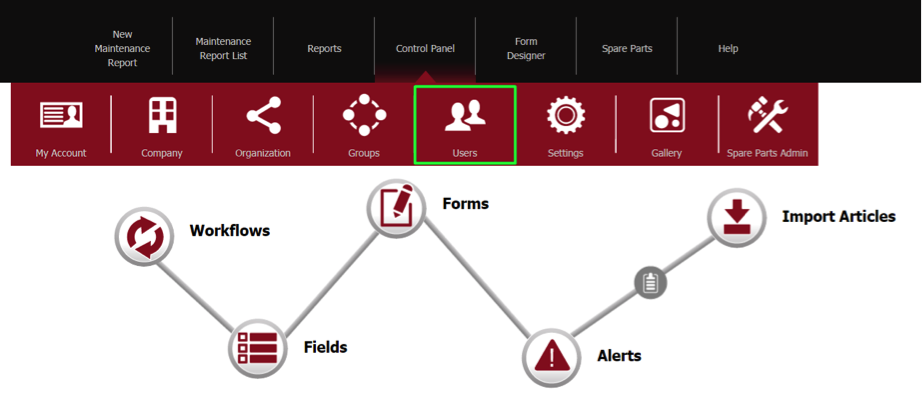
- Click on +Add User
- Fill out all necessary data. Notice that on the Permissions area you have two options: either select a group permission to populate with the pre-selected template or you can select the individual permissions. Note that you can select group permission for a user and still modify individual permissions.
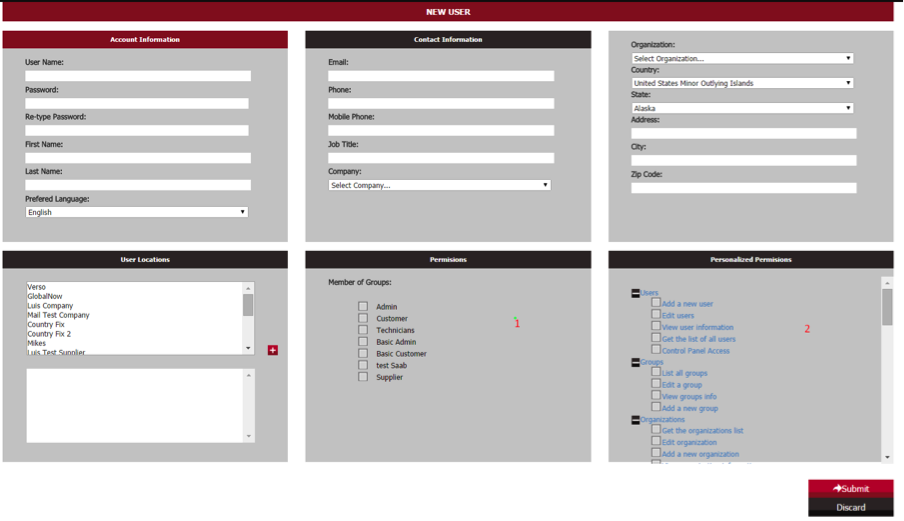
- Notice that under User Locations you can select as many companies as needed. This allows the user to enter their own company and all the locations simultaneously without creating a different user for every company.
11) Alerts Creation
VERSO allows the customer to have 3 sets of Alerts that can be configured:
- Change Step: Using a customer configured email, this alerts the user when an MTR changes status.
- Reminder: By using an already created KPI configuration, the alert will notify the user by email when an MTR has remained over the KPI limit thus notifying the user that action must be taken.
- Outbound: This alert is set to create a status list of all MTRs and place them into our API area for the client’s system to retrieve. This enables the client’s system to be in constant synchronization with VERSO, creating visibility to the inventory flow changes.
Change Step and Reminder Alerts:
These two alerts work on email generation so their steps will be the same.
- Log into VERSO and Click on Control Panel:

- Click on Alerts

- Click on +Add Alert
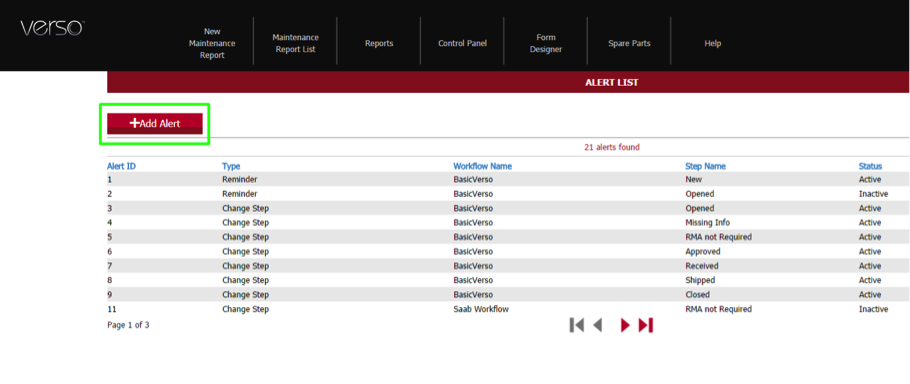
- Select the type of Alert you want to create: Change Step / Reminder.
- Make the rest of selections that you require in order to complete your Alert.
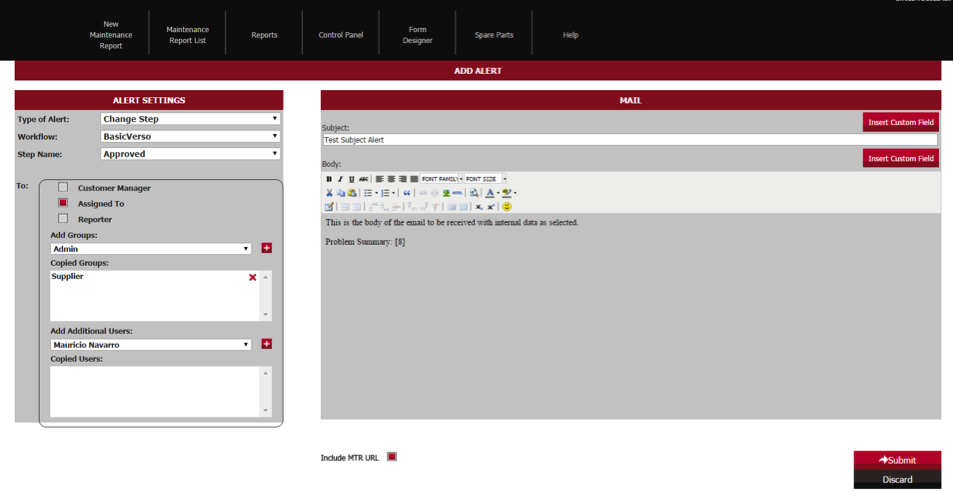
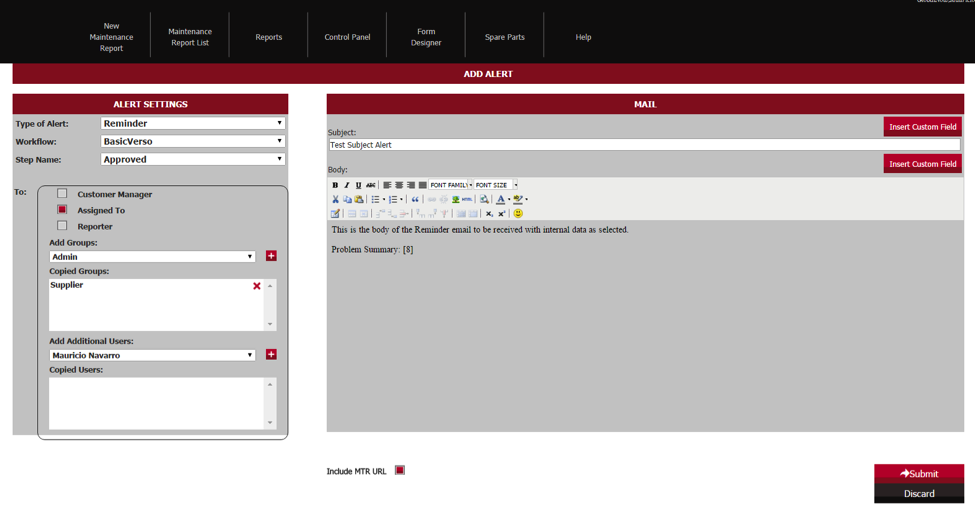
- Click on Submit.
Outbound Alerts:
- Log into VERSO and Click on Control Panel:

- Click on Alerts
- Click on +Add Alert

- Select the type of Alert you want to create Change Outbound
- Fill out all the necessary information of the data you want to collect
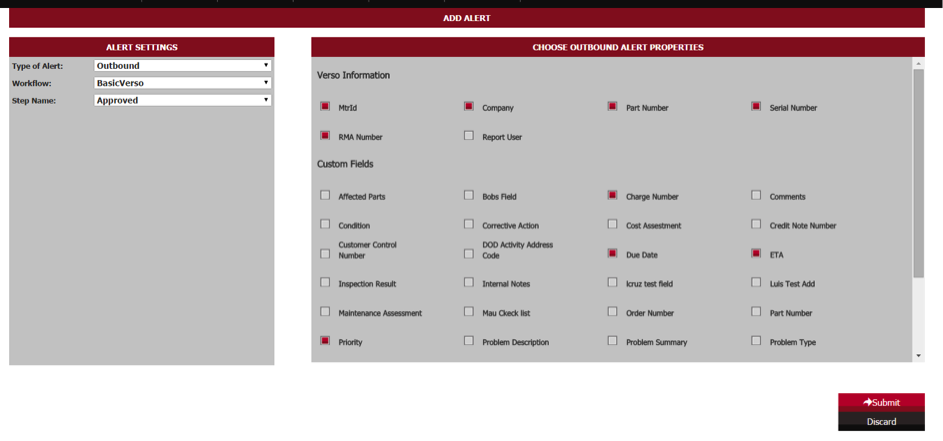
- Click on Submit.